Tag: BBQ Injector

  • Smoked Boneless Turkey Breast on the Weber Kettle

    Smoked Boneless Turkey Breast on the Weber Kettle

    Remember those Thanksgivings in the ’80s, when Dad would fire up the Weber in the backyard even if snow was falling? The smell of charcoal mixing with turkey fat, the sound of that metal lid clanking—it was a simpler time. That’s the vibe I chased in my latest cook: a boneless turkey breast smoked low and slow on the Weber Kettle using the classic snake method.

    Why Go Boneless?

    If you’re a Gen X guy juggling work, kids, and the holiday rush, this one’s for you. No wrestling a 20-pound bird, no marathon cook—just a 3–4 lb. boneless turkey breast that smokes to perfection in a couple of hours. It’s the ideal size for a small Thanksgiving or weekend dinner, feeding four to six without taking over your entire day.

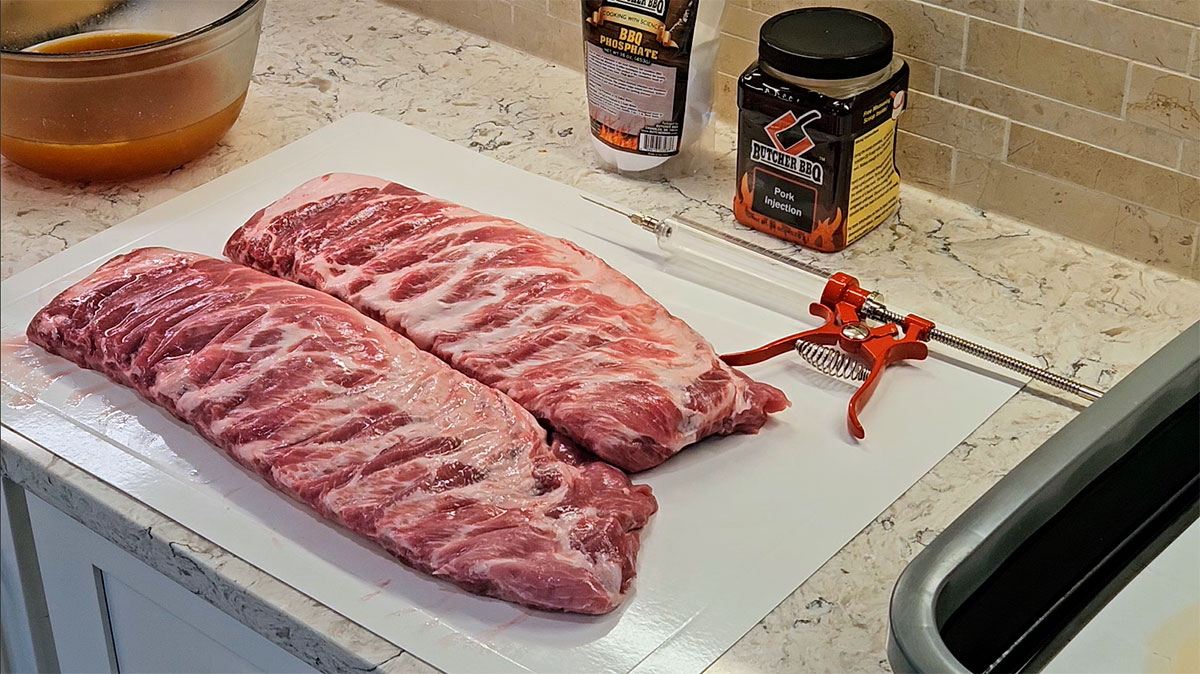
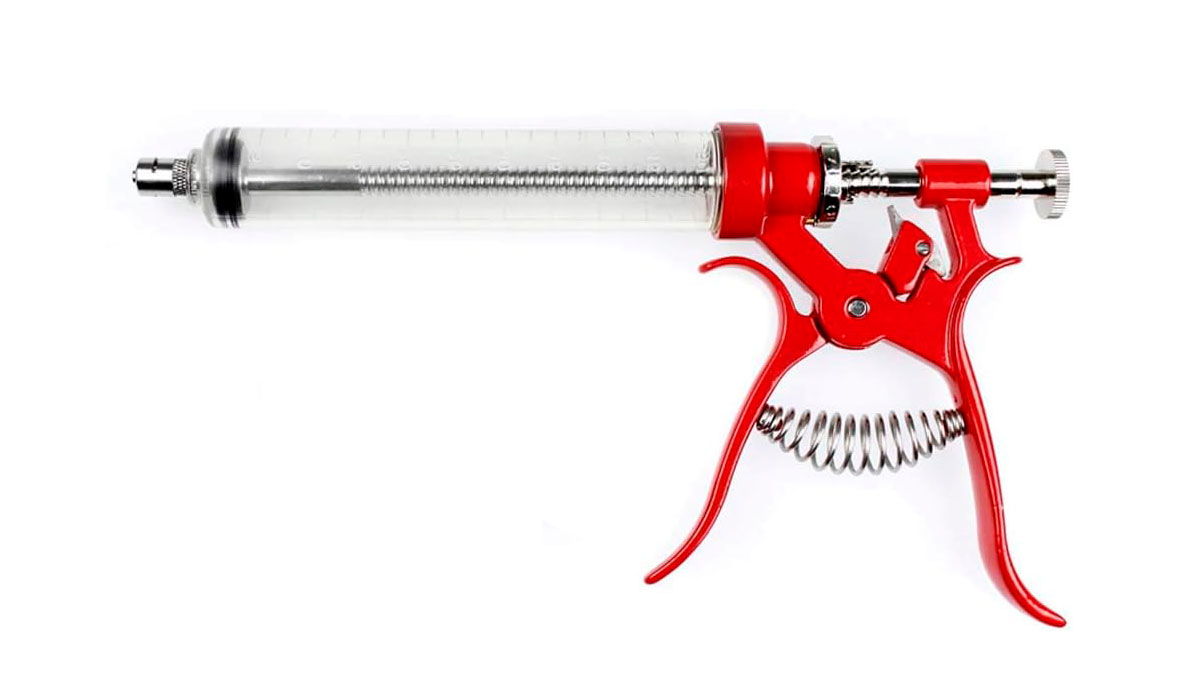
    And here’s the best part: boneless turkey breast soaks up flavor like a sponge, especially when you use an injection. That’s where the Butcher BBQ Pistol Grip Injector comes in—it’s built for precision and power, pushing that injection deep into the meat for juicy results every time.

    What You’ll Need

    • 3–4 lb. boneless turkey breast, thawed
    • 1 bottle Butcher BBQ Original Bird Booster for injecting
    • Butcher BBQ Pistol Grip Injector
    • My homemade turkey rub:
      • 2 tbsp smoked paprika
      • 1 tbsp fine kosher salt
      • 1 tbsp black pepper
      • 1 tbsp onion powder
      • 1 tbsp garlic powder
      • 2 tsp rosemary
      • 1 tsp dried mustard
    • Charcoal briquettes
    • Applewood chunks or chips
    • Butter or Parkay spray for basting

    Prep the Boneless Turkey Breast

    Prep is quick and easy:

    1. Pat dry the turkey breast with paper towels.
    2. Using your Butcher BBQ Pistol Grip Injector, inject the Bird Booster mixture in a grid pattern. Use about 1/8 cup of Bird Booster powder mixed with 1 cup of water for this size cut.
    3. Season evenly with the homemade turkey rub, coating all sides. Let it rest for 30–60 minutes while you set up the grill.

    That rub smells amazing! It has a hint of BBQ smoke and a touch of rosemary to keep that Thanksgiving flavor alive.

    Weber Kettle Snake Method Setup

    Now, let’s fire up the Weber Kettle using the snake method—old-school, reliable, and perfect for steady low-and-slow cooking.

    1. Line charcoal briquettes in a “C” shape around half the grill, two briquettes wide and two high.
    2. Add three applewood chunks along the snake for that sweet, mild smoke.
    3. Light 8–10 briquettes at one end of the snake and let them gradually ignite the rest as it burns around.
    4. Set a drip pan in the center and fill it halfway with water.

    You’re aiming for a grate temperature between 240–260°F (115–126°C). Once you’re dialed in, place the turkey breast in the center of the grate.

    Smoking & Basting

    Insert a probe thermometer to track internal temperature and let the Weber do its thing.

    • After 2 hours, baste with melted butter or Parkay spray to keep the surface golden.
    • Rotate the breast if needed for even color.
    • If the skin starts drying out, a quick spritz of water helps keep it moist.

    When the internal temp reaches 160°F (71°C), double-check with an instant-read thermometer. Pull it off the smoker—carryover heat will bring it up to 165°F (74°C) while it rests. Tent loosely with foil for 15–30 minutes before slicing.

    If you placed a pan under your turkey, those drippings make an incredible base for gravy.

    A Few Tips from the Pit

    1. Don’t skimp on the injection. The Bird Booster and Pistol Grip Injector combo keeps the meat juicy, even if you overcook slightly.
    2. Watch your snake. If the line breaks or dies out around the bend, relight with a few hot coals.
    3. Leftovers? Use them for smoked turkey chili or a turkey noodle soup that’ll bring back childhood memories.

    In Conclusion

    There you have it—a simple, flavorful way to smoke a boneless turkey breast on your Weber Kettle. It’s quick, low-stress, and packed with that nostalgic backyard BBQ flavor.

    Tag me if you try it and share your Weber stories, I’d love to hear how your cook turned out. Here’s to Thanksgivings that feel like home, just with a little more smoke.

  • How to Inject a Turkey

    How to Inject a Turkey

    How to inject a turkey is an easy process. It only takes a little patience and time to learn how to do it. Remember the “National Lampoons Christmas Vacation” turkey? Yeah, let’s talk about how to avoid a dry turkey this year!

    Why Inject a Turkey

    Why do we inject a turkey you ask? Let me start out by saying, if you have never smoked a turkey, this will forever change your Thanksgivings going forward! A properly injected turkey, with the smokiness from a BBQ pit, beats a bird cooked in an oven any day!

    Here are a few reasons why we inject a turkey:

    1. It is quicker than wet brining.
    2. Add additional flavor deep into the meat.
    3. Prevents the meat, especially the breast meat, from drying out.

    What Tools do You Need to Inject a Turkey

    The tools we recommend to inject a turkey are below:

    That’s pretty much it.

    The Turkey Injection Process

    Now, we get to the good stuff, the turkey injection process! The mixing process is very easy. Once you take the time to inject, you will be AMAZED at how much moisture and flavor is in your bird!

    Mixing the Injection

    First, mix your injection. We are using Butcher BBQ Original Bird Booster in this example. It suggests 2 cups of water and ¼ cup or one full scoop of Bird Booster.

    Turkey Injection - Butcher BBQ Bird Booster - Scoop

    Add the water to a bowl and use a whisk or immersion blender to mix the Booster. It is quick dissolving, so it only takes about 30 seconds, and we are ready to inject the turkey!

    Inject a Turkey - Mixing

    This 2-cup mixture will inject a 10-15 lb turkey. If you are injecting multiple turkeys or a larger bird you will want to double the mixture.

    Pro Tip – Each turkey injection has a specific amount needed to get the proper flavoring. Be sure to read the instructions before mixing.

    Injecting the Bird

    When injecting a turkey, I use a pistol grip injector. It comes with a large and small needle. I have used both a larger needle and a smaller needle when injecting a turkey. In my experience the smaller needle works better.

    Using a larger needle is harder to distribute the injection evenly throughout the meat. The larger needle tends to pool and create a “pocket” of the injection in the meat.

    On the other hand, with a smaller needle it’s easier to distribute the injection evenly throughout the meat.

    Inject the turkey in a checkerboard pattern as best as you can, particularly with the breast meat. You want the breast meat to be as full of injection as possible.

    How to Inject a Turkey - Inject a Turkey

    Now, as you inject, you want to pull the needle out slowly and this will help distribute the injection in the meat.

    You will know when the turkey breast is full because injection will come out of previously injected areas.

    The dark meat has more intramuscular fat, while you still want to inject these areas, the breast and wings are your main focus.

    Also, when injecting the wings it is much easier to inject with the smaller needle!

    Turkey Injection - Wing

    In Conclusion

    Well, that is about it when it comes to injecting a turkey. Your primary focus is on the turkey breast meat, but make sure to get the wings, legs, and thighs as well.

    When Thanksgiving rolls around this year, if you follow this process, you will be known as “Mr. Turkey” going forward!

    When you are finished, dust it with some rub and it is ready for the smoker!

    We would love to hear from you, please post a comment below and let us know how the process worked!

  • How to Inject Ribs

    How to Inject Ribs

    BBQ ribs are a go-to meat for any pitmaster. When you learn how to inject ribs, it changes everything! Your St. Louis ribs, babyback ribs, and spare ribs will be bursting with moisture and flavor!

    BBQ Ribs That Squeeze Out the Moisture

    Let’s be honest: sometimes ribs come out a little dry. I’ve done it, you’ve done it, and if you haven’t, you will. It’s inevitable.

    Now imagine biting into a juicy, flavorful pork rib! A St. Louis rib so full of moisture you can literally squeeze the juices out! That’s what I’m talking about!

    Why Inject Pork Ribs?

    Why inject ribs? It’s simple: to add moisture and flavor. Injecting ribs changes the flavor profile internally and complements your BBQ rub.

    What Do You Inject Ribs With?

    You can inject ribs with anything from apple juice to BBQ phosphates. We recommend using Butcher BBQ Phosphate and Butcher BBQ Pork Injection. These are what the pros use for injecting ribs in competition!

    The phosphates lock in moisture at the cellular level, and the pork injection adds an amazing flavor that has won championships!

    How to Inject Ribs - Inject Pork Ribs - BBQ Injector

    What Are BBQ Phosphates?

    BBQ phosphates are a type of salt that “grab” water and hold onto it when you inject your ribs. Learn more in our blog post on “What is BBQ Phosphate Injection?”

    What You Need to Inject Ribs

    When you plan to inject ribs, you only need a few tools:

    The Rib Injection Process

    Now to the fun part! Measure out the recommended quantity of BBQ Phosphate and Pork Injection. Slowly add the dry ingredients to water and mix thoroughly to remove clumps.

    Many pitmasters inject ribs from the top, but we suggest injecting from the side. In our experience, this results in better bark formation.

    Inject one side of the ribs, spin it around, and inject the other side. Piece of cake!

    How Much to Inject?

    Pork ribs aren’t the thickest meat, so you don’t need much—about 2-3 cc of injection per side. Our BBQ Injector lets you dial in specific amounts! Using the smaller needle, set the chrome circular dial to 2 or 3 cc. Each pull injects that exact amount.

    How to Inject Ribs - Inject Pork Ribs - BBQ Injector Dial

    Pull the trigger as you remove the needle, and you’re done! Each rib should hold about 50 cc of fluid total. You’ll know it’s full when fluid starts shooting out the top or sides.

    How to Inject Ribs - Injecting Ribs for Competition

    In Conclusion

    Now you know how to inject ribs! You have the tools and the knowledge, all that’s left is to take action!

    How to Inject Ribs - Inject Pork Ribs - BBQ Rub

    We’d love to hear about your process! Please leave us a comment below!

  • BBQ Injector – Top 3 Things to Look For

    BBQ Injector – Top 3 Things to Look For

    You have the smoker, you have the meat, now you need a BBQ Injector. Well, my friend, we have put together the top 3 things you need to know when buying one.

    Build Quality of a BBQ Injector

    A BBQ injector should be strong enough to handle any BBQ injection you want to use. Some injections can be quite thick. If you have a cheap plastic injector, then you may have issues adding the BBQ injection to the meat.

    Plastic vs Metal

    Metal BBQ injector vs a plastic injector, is where a lot of new pitmasters choose a cheaper injector. This can be an issue, because a plastic injector is usually cheaper and suitable for occasional use. They can be prone to breaking more easily, especially when injecting thicker liquids.

    However, a metal injector is generally considered more durable. It is resistant to cracking, and better for frequent use due to its ability to withstand cleaning and it will not absorb odors.

    Needle Size for Flavor Distribution

    When it comes to your BBQ injector, you need to understand that not all injections are created equal. Some are thin, others are like broths, and some are thicker like BBQ mud or marinades.

    The right needle makes all the difference. A good BBQ injector should come with multiple size needles. One needle with a wider opening for thicker injections and a finer needle for liquid-based marinades.

    Versatility of your barbecue meat injector counts! Especially if you cook different types of meat. Large cuts like brisket and pork shoulder require deep penetration. While smaller cuts of meat, like chicken breasts or ribs, accept the injection with a finer needle.

    A high-quality BBQ injector gives you the flexibility to adapt to whatever you plan on smoking!

    BBQ Injector Needles

    Needle Durability

    Another key factor is needle durability. Thin, flimsy needles can bend or break, making the whole process frustrating. A well-built injector with stainless steel needles that can handle both thin and thick marinades.

    And let’s not forget the cleaning, opt for an injector that easily comes apart for hassle-free washing.

    Capacity and Convenience: Inject more and Refill Less

    Imagine with me for a moment, you have a BBQ injector, and it has a small capacity. Now how long do you think it will take to inject that brisket? A very long time, right!

    Now imagine a beef brisket injector with a capacity larger than 1 ounce. It still might take a while but now add a pistol grip handle. Now that is what we are talking about!

    BBQ Injector Pistol Grip Handle

    Finding a BBQ injector with a large capacity barrel, and a pistol grip handle is what you need! This will increase your efficiency, convenience, and ergonomics so your hand doesn’t cramp. Do I need to say more?

    BBQ Injector Barrel

    BBQ Injector – Bonus Feature

    We wanted to provide an additional bonus feature to look for in a BBQ injector. The extra feature that helps get the right amount injected would be a controlled selection amount.

    This is a feature that helps pitmasters in competitions really know exactly how much injection is going into their meats. In competitions consistently is key! If a little too much or too little injection goes into your ribs, that variable could land you in second place!

    BBQ Injector Controlled Selection Amount

    In Conclusion

    The 3 things to look for with a BBQ injector are:

    1. Build Quality
    2. Needle Size (durability)
    3. Capacity and Convenience
    4. Controlled Selection Amount (bonus feature)

    These features will save you time and frustration when injecting your BBQ.

    A metal construction strength and longevity.

    Needles constructed of stainless steel and different sizes for different meats.

    A comfortable grip to reduce hand fatigue.

    Finally, a controlled selection amount to get the exact amount of injection into your meats.

    We have a BBQ injector that is perfect for injecting any meats. It is a Butcher BBQ Pistol Grip Injector. It is constructed of an all-metal pistol grip handle, high-capacity barrel, two different needle sizes, AND a controlled selection amount feature! Everything you need inject flavor into your BBQ!

    With a BBQ Injector and let’s inject some delicious flavor into your next BBQ!