Author: Pitmaster Essentials

  • BBQ Pulled Pork Dry Rub – How to Smoke a Pork Butt

    BBQ Pulled Pork Dry Rub – How to Smoke a Pork Butt

    A BBQ Pulled Pork Dry Rub is the flavor foundation of your pork butt. Outside of a pork injection, it adds flavor and helps create that delicious bark. Let’s chat about it.

    Summertime is Coming

    Smoking pulled pork is simply a BBQ classic. Nothing says “Summer’s Coming” like a sweaty butt! It brings back memories of when dad would fire up the smoker on a beautiful Saturday morning!

    He would tend to the smoker all day and we would have wonderful pulled pork sandwiches for dinner!

    What Makes a Great Pork Rub for Pulled Pork?

    The BBQ pulled pork dry rub we are referring to is Butcher BBQ Premium Rub. This is a delicious rub that is not only a pulled pork rub, but it is fantastic on pork ribs, pork tenderloin, steak, brisket, and chicken.

    Here’s what makes it great rub:

    • It has a brown sugar base for a little sweet.
    • Paprika and other spices for a bit of a kick at the end.
    • Highest quality ingredients used.
    • Hand blended in small batch productions.
    BBQ Pulled Pork Dry Rub - Butcher BBQ Premium Rub

    Trim that Pork Butt

    Before applying our pulled pork rub, we want to trim that pork butt. Grab a sharp boning knife and let’s get started.

    The butchering process for a pork butt can be sloppy. Sometimes they may leave scores in the meat that will easily burn up during the cook. Use your boning knife and carefully remove any part that might be dangling.

    When I trim a pork butt, I think about what I don’t want my family to eat. For example, if you find anything tough or inedible, like a piece of gristle, gone. If you see a large artery or vein, get that out of there too!

    BBQ Pulled Pork Dry Rub – Let’s Apply It

    One nice feature of Butcher BBQ Premium Rub is it comes in its own shaker bottle. Simply pop the top to expose the small holes and you are ready to go.

    This is a large piece of meat, so apply a liberal amount of BBQ pulled pork dry rub. If your pork butt is 8-9 lbs most of the meat will not be exposed to the rub. The rub will only be on the outside so cover that butt!

    How to apply the rub:

    1. Start with the presentation side down.
    2. Hold the shaker bottle 4-6 inches above the meat.
    3. Shake side to side and evenly distribute the rub.
    4. Flip and hit each side with rub.
    5. Finally sprinkle the rub on your presentation side.
    6. Press the rub into the meat.
    7. Let it rest in the fridge for 45 minutes until it starts to sweat.

    Once it is pulled, the external part of the pork butt will mix with the rest of the meat. This is when the pork dry rub will balance out the meat to rub ratio.

    Pulled Pork Rub - Pork Butt

    Time to Smoke the Pork Butt

    We shoot for a grate temperature around 275 degrees. At this temperature you should expect a 7-9 hour cook.

    We suggest spritzing every two hours with a barbecue spray bottle. We use water, but you can use apple juice, white grape juice, whatever flavor sounds good to you.

    We are just adding layers of flavor at this point.

    BBQ Pulled Pork Dry Rub - Barbecue Spray Bottle

    Time to Wrap

    Your pork dry rub is doing its thing and has formed an amazing dark bark! We first eat with our eyes, so this has amazing eye appeal!

    After about 5-6 hours your internal temperature should reach 165 degrees and it’s time to wrap.

    • Hit it with some more Butcher BBQ Premium Rub.
    • Add 4-5 pats of butter, remember butter is your friend in BBQ!
    • Add some brown sugar.
    • Optional – Add some juice, or leave it as is, completely up to you.
    • Tightly wrap in two layers of heavy-duty aluminum foil.

    Back on the pit at the same temperature, 275 degrees, for a few more hours.

    Pork Butt is Done

    After another 2-3 hours it’s time to check the temperature with a probe thermometer. Your internal temperature should be between 200-206, but you are looking for no resistance when probing.

    Time is irrelevant at this point of the cook. You want to focus on how the pork butt feels. That thermometer should pierce the pork butt with no resistance.

    Time to Rest

    Let your pork butt rest for at least an hour. The longer the better, but we would suggest not resting longer than 3 hours.

    Resting allows time for the au jus sauce created with the BBQ pulled pork dry rub to absorb some back into the meat.

    Let’s Pull That Pork Butt

    Now that is a beautiful pork butt! The pork butt rub has created some amazing color and it smells amazing!

    If you have a bone in pork butt, a clean bone pull is a good sign!

    Grab a pair of pork shredding claws and simply pull the meat apart. It is so tender, juicy and it pulls apart with zero resistance!

    Now we are ready to add some BBQ sauce and make some pulled pork sandwiches!

    BBQ Pulled Pork Dry Rub - Pulled Pork Rub - Pulled Pork

    Pro tip – As you start to pull, add some of the au jus sauce from your foil wrap into the pan. This will add more flavor and keep the pulled pork moist.

    In Conclusion

    After using our BBQ Pulled Pork Dry Rub, you now know how to create an amazing meal for your family! With primary ingredients, a little knowledge, you can create amazing smoked pulled pork in your backyard.

    Now, who’s ready to fire up the pit and start cooking? Guys, get in on this Butcher BBQ Premium Rub and let us know in the comments how it turned out!
  • How to Make Your Own Rib Rub

    How to Make Your Own Rib Rub

    Around here we like to make your own rib rub every once in a while. It’s fun, easy, and you can get the kids involved as well. Let’s chat about it.

    What’s a Rib Rub Anyway?

    First, what is a pork rib rub? Well at a high level it is a mix of spices, herbs, and sometimes sugar. A homemade rib rub adds flavor, creates that crust we all love, and can even tenderize the ribs a bit.

    Rubs also add colors to your meats! The colors range from a beautiful mahogany, brown, yellows, etc. depending on the ingredients.  This makes it appealing to the eye as well as the taste buds!

    You spread the seasoning on your pork rib, let it sit prior to cooking, and the rub infuses flavor into your ribs.

    Make Your Own Rib Rub - Make Your Own Dry Rub for Ribs

    Why Bother Making Your Own Rib Rub?

    Why do you make your own dry rub for ribs instead of grabbing something off the shelf? Simple: control. You decide the heat, the sweet, the smoky, whatever your flavor profile.

    It’s easy, it is fun, and most of all you get to experiment. You can pass along your BBQ seasoning knowledge to your kids. They get involved and you have created a bonding time with them.

    You can get them excited about BBQ and share your passion for smoking their own food!

    What You’ll Need

    Here’s the lineup to make your own rib rub:

    • Brown sugar: Adds sweetness and that sticky caramelized finish.
    • Paprika: Brings color and a smoky edge.
    • Salt: Pumps up every other flavor.
    • Black pepper: Gives it some bite and builds bark.
    • Garlic powder: Savory depth, no chopping required.
    • Onion powder: More savory goodness.
    • Cayenne pepper: Optional, for a little heat.

    Pork Rib Rub Recipe

    Ready to make a dry rub for ribs? Try this recipe:

    Ingredients:

    • 1/4 cup brown sugar
    • 1/4 cup paprika
    • 2 tablespoons salt
    • 1 tablespoon black pepper
    • 1 tablespoon garlic powder
    • 1 tablespoon onion powder
    • 1 teaspoon cayenne pepper (if you want a some heat)

    Instructions:

    1. Toss everything into a bowl and mix it up. You may need to adjust the ingredients depending on how many racks of ribs you are smoking.
    2. Stash it in an airtight container until you are ready to cook some ribs.
    3. Use a shaker bottle or some way to spread the seasoning evenly across your ribs. You want to press the rub into the meat instead of rubbing the rub.
    4. Put the ribs in the fridge to chill for a minimum of 45 minutes.
    Make Your Own Rib Rub - Make a Dry Rub for Ribs

    Pro Tip

    After you apply your homemade rib rub, let it sit on the ribs for a few hours. When it comes to BBQ, we have learned not to rush anything. The longer you can let the seasoning sit the better.

    If you can leave it overnight this will add huge amounts of flavor to your ribs! This will initiate a process called “dry brining”. The salt pulls moisture out of the meat, creates a brine, then the meat sucks it back in with all the deliciousness.

    In Conclusion

    There you go a quick and simple way to make your own rib rub. This pork rib rub recipe is your entry to this process. Start with this recipe, make it your own, and have fun bonding with the kids while experimenting.

    Also, I know we all don’t have a lot of time to create our own homemade rib rubs. In that case I would recommend our Butcher BBQ Honey Rub or Butcher BBQ Cherry Rub. Both have wonderful honey and cherry flavor profiles for your pork ribs!

    We would love to hear about your experiences, so please leave us a comment below!

  • Rub for Smoking a Brisket

    Rub for Smoking a Brisket

    When we think of brisket, it is the king of BBQ! However, it all comes down to the rub for smoking a brisket! The rub is the foundation of a great brisket, and it makes for some delicious meat!

    Picture This – Warm Saturday Afternoon

    Picture this – It’s a warm Saturday afternoon, and the smell of hickory smoke is drifting through your backyard. You’ve been attending your smoker all day.

    The smell of brisket, hickory smoke, and the brisket rub fill the air. Your brisket is nearly finished and it is almost time to rest.

    After a few hours resting, it is now time to reveal the main dish for dinner.

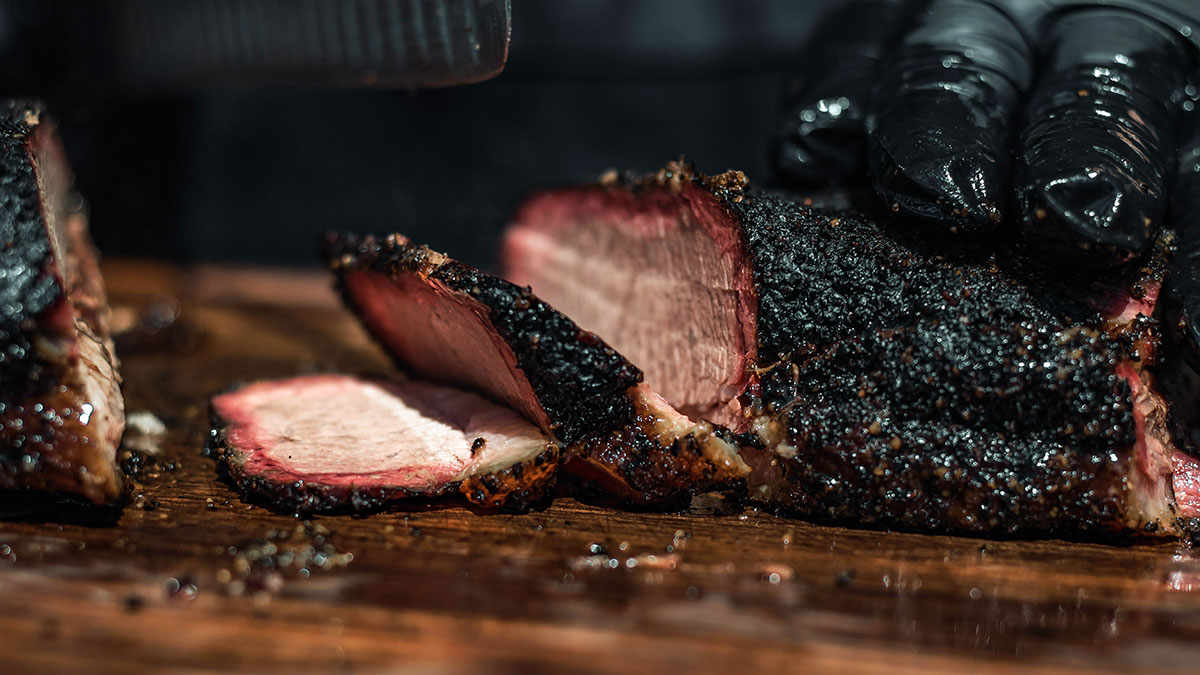
    Your brisket looks delicious. This brisket rub for smoking helped form an amazing bark that is rich and full of flavor.

    What’s the secret rub behind this amazing brisket? That would be Butcher BBQ Steak and Brisket Rub!

    Rub for Smoking a Brisket - Best Spice Rub for Brisket

    Rub for Smoking a Brisket – The Foundation

    If you’re passionate about brisket, you know the rub is the foundation of flavor. The rub for smoking a brisket is the key to that delicious bark. It is the difference between a decent brisket and one that wows your family.

    That’s where Butcher BBQ comes in. David Bouska, owner of Butcher BBQ, is a legend among the BBQ community. Butcher BBQ is known for their award-winning BBQ products.

    David has put his years of BBQ expertise into the Steak and Brisket rub. It is a definite pitmaster essential for your spice cabinet.

    Butcher BBQ Steak and Brisket rub

    Our brisket rub is inspired by Texas brisket. Butcher BBQ Steak and Brisket Rub is a beef brisket seasoning recipe that will bring out that Texas style flavor we all strive for.

    This brisket rub is one of the best spice rub for brisket. It combines salt, pepper, garlic, and a hint of lemon oil for an amazing flavor combination.

    Rub for Smoking a Brisket - Beef Brisket Seasoning Recipe

    How to Make the Most of a Brisket rub

    Here’s how to make the most of your brisket rub for smoking:

    • Start by using a dry paper towel and patting your brisket dry.
    • Then, sprinkle on a generous, even layer of brisket rub. This is a large piece of meat so don’t skimp and press it into the meat.
    • For maximum flavor, let it sit in the fridge for at least an hour, or even overnight if you have time to wait.
    • When you’re ready to smoke, keep the grate temp around 225°F. This is low and slow cooking, and watch that rub transform into a beautiful, dark, flavorful bark. Trust me, your patience will pay off.

    In Conclusion

    Are you ready to see what this rub for smoking a brisket can do for you?

    Pick up a bottle of Butcher BBQ Steak and Brisket Rub and give it a shot. Once you taste the difference, you’ll wonder how you ever cooked a brisket without it.

    If you have a brisket story after trying our brisket rub, drop a note in the comments below. I’d love to hear how it turned out!

    Also, check out our blog post about “How to Smoke a Brisket”.

  • Pork Loin Rub for Smoker – Butcher BBQ Grilling Addiction

    Pork Loin Rub for Smoker – Butcher BBQ Grilling Addiction

    Pork loin rub for smoker is for the backyard pitmaster that is ready to wow his family! This BBQ pork loin rub will lock in flavor and when smoked to 140 degrees it will be moist and flavorful. Let’s talk about it!

    What is a Pork Loin?

    Before we start talking about our rub for pork loin roast, let’s explain what a pork loin is. A pork loin is a delicious oblong shaped cut of meat from the back of the pig. This is not to be confused with the pork tenderloin. The pork loin is much bigger and is often sold as a pork loin roast or cut into pork chops.

    Why use Rubs for Pork Loin Roast?

    Why do we use a pork loin rub for smoker you ask? The rub is the flavor foundation to the pork loin. The salt in the rub acts as a dry brine and infuses flavor the longer the rub sits on the pork loin.

    This particular BBQ rub is Butcher BBQ Grilling Addiction, but don’t let the name fool you. It is not just for grilling, but smoking meat as well! Actually this BBQ pork loin rub contains salt, pepper, garlic, and onion, but what gives your pork loin a zing is the lemon peel!

    Adding a slight lemon flavor gives it a zest for a delicious lemony flavor! This is the ingredient that will wow your family!

    How to Smoke Your Pork Loin

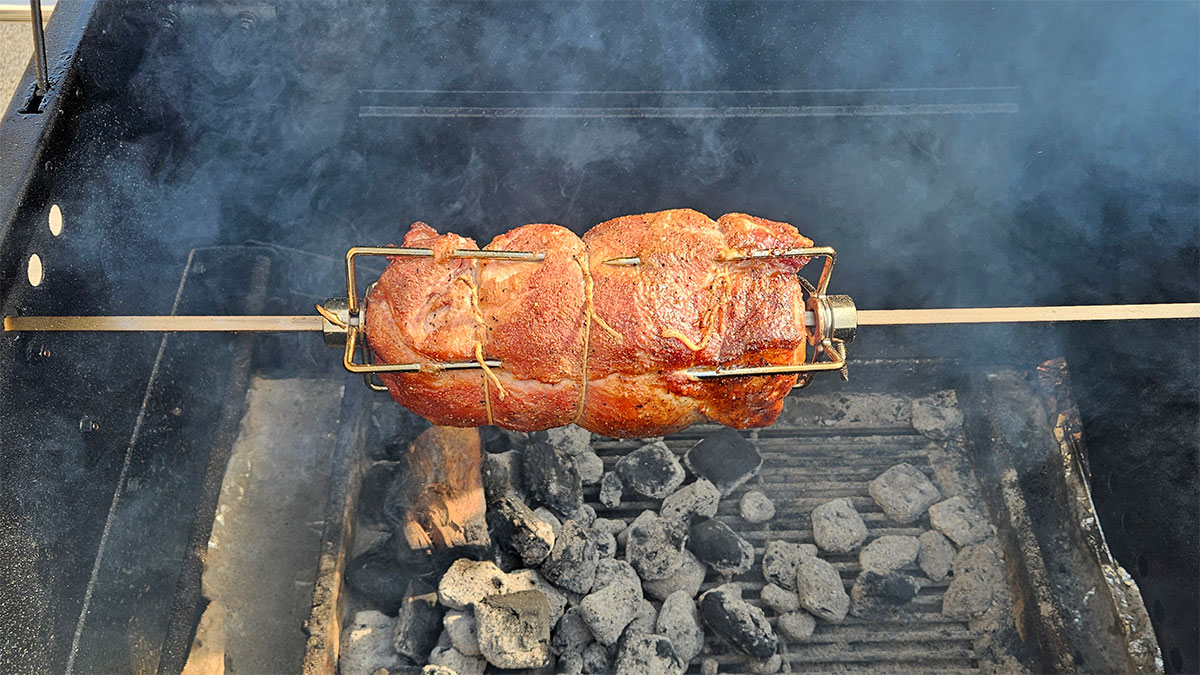
    After applying the BBQ pork loin rub it’s time to smoke it. You can smoke a pork loin on a barrel smoker, an offset smoker, pellet smoker, or a rotisserie. If you have the option, we would recommend using a rotisserie!

    Pork Loin Rub for Smoker - Pork Loin Roast - Pork Loin Rotisserie

    Couple of pointers:

    • Wood choice for smoking a pork loin roast : When smoking pork you want to stick with a light wood. Cherry, apple, or other fruit woods are best.
    • Time and temperature: Shoot for an internal temperature around 140 and it will carry over to 145 as it rests. This ensures the pork loin doesn’t over cook and will be full of moisture.
    • Resting: Let your pork loin roast rest for a minimum of 15 minutes.

    Smoking a pork loin is very easy. No wrapping, no injecting, just dust it with a BBQ pork loin rub and start cooking.

    A Recent Cook

    We recently smoked a 4 lb pork loin roast on our Hasty Bake Legacy with the rotisserie attachment. We used our pork loin rub for smoker, i.e. Butcher BBQ Grilling Addiction, and it trued out amazing. The total cook time was just about and an hour and twenty minutes. The Legacy temp was around 300 degrees and it was flavorful and full of moisture!

    Pork Loin Rub for Smoker - Pork Loin - Pork Loin Roast

    In Conclusion

    That’s pretty much it for our chat about pork loin rub for smoker. The best thing we can suggest is grab a bottle of BBQ rub, and start cooking! Remember Pitmaster Essentials is where flavor meats smoke!

    Also, if you have a charcoal smoker like we do, here is a short read on, “How to Light a Charcoal Smoker”.

  • Dry Rub vs Seasoning – What is the Difference?

    Dry Rub vs Seasoning – What is the Difference?

    Dry rub vs Seasoning, “What is the difference?” This is a question that a lot of newbies in the BBQ world ask. The main difference is a BBQ rub is applied before cooking and BBQ seasoning is added during or after the cook.

    Let’s dive in a little deeper and elaborate on the difference between a Dry rub vs Seasoning.

    BBQ Rub – What is it exactly?

    A BBQ rub is a mixture of spices, herbs, salt, and sometimes sugar. Rubs are generally made up of granular or  more course spices.

    Dry Rub - BBQ Rub - Dry BBQ Rub

    The coarser texture of the dry rub helps to build a crust or “bark” on the meat. What is bark you ask?

    Bark is a flavorful crust on the exterior of the meat that forms during the smoking process. It is a result of the combination of smoke, heat, rub, rendered fat, and the Maillard reaction.

    The BBQ dry rub’s main purpose is adding flavor to the meat before cooking. The rub is applied to your meat prior to cooking. While the rub sits on the meat it starts a dry brining process.

    Guys, dry brining is what separates the novice from the pro, and it adds so much flavor to the meat!

    Dry Brining at a High Level

    • Dry brining will draw out moisture from the meat.
    • The moisture dissolves the salt to create a brine.
    • This brine is concentrated, and the brine will soak back into the meat.
    • We suggest a minimum of 45 minutes for the dry brining process to maximize the BBQ rub absorption process.
    • The longer you let the rub sit on the meat the better!

    Using a dry rub to dry brine your meat is very easy, it just takes planning and some time for the process to complete!

    What is BBQ Seasoning?

    BBQ seasoning is similar to a rub. However, it is composed of finer or more powdery ingredients than we find in a rub.

    BBQ Seasoning - Seasoning

    Barbecue seasonings are usually applied while your meat is cooking or after you have finished cooking. The best BBQ seasonings are comprised of salt, pepper, garlic powder, onion powder, and mustard powder.

    In Conclusion

    So, there you have it, Dry rub vs Seasoning in a nutshell. They both have their applications; dry rubs can be used for low and slow smoking. BBQ seasonings are more for grilling, but this is not set in stone.

    BBQ is all about experimenting, so use a BBQ seasoning or BBQ dry rub, however you please. Now, you know the difference so let’s start cooking!

    Also, we think you might be interested in make DIY BBQ Rubs! Take a minute to read “DIY BBQ Rubs – 5 Easy Homemade BBQ Rubs“

  • How to Smoke Beef Short Ribs

    How to Smoke Beef Short Ribs

    How to smoke beef short ribs, very easy with just a few tips. They are tender, giggly, and delicious when they are finished!

    Picture this, today was a beautiful spring day. The morning was crisp with frost on the grass and temps around 30 degrees. The high for the day is 60 degrees.

    The sun is out and there are no clouds in the sky. It was time to smoke some beef short ribs for the family. It’s not too hot and not too cold, perfect weather to fire up the smoker!

    Dry Rub for Short Ribs

    You will want to grab a dry rub for short ribs. We will use Butcher BBQ Steak and Brisket Rub for this cook.

    It adds a combination of salt, pepper, garlic, and a hint of lemon oil for some amazing flavor.

    Prep and Trim

    Now if you purchase beef short ribs, they may come all intact. If you have a drum, WSM, or smaller smoker, you may decide to cut the rack in half. This will save space and speed up the cooking process.

    Your beef ribs may have a thick fat cap. If so, use a sharp boning knife and trim it down so the meat is exposed.

    This allows the beef rib rub to penetrate the meat and start a dry brine. The dry brining process adds tons of flavor, that is well worth it!

    Apply the Dry Rub for Short Ribs

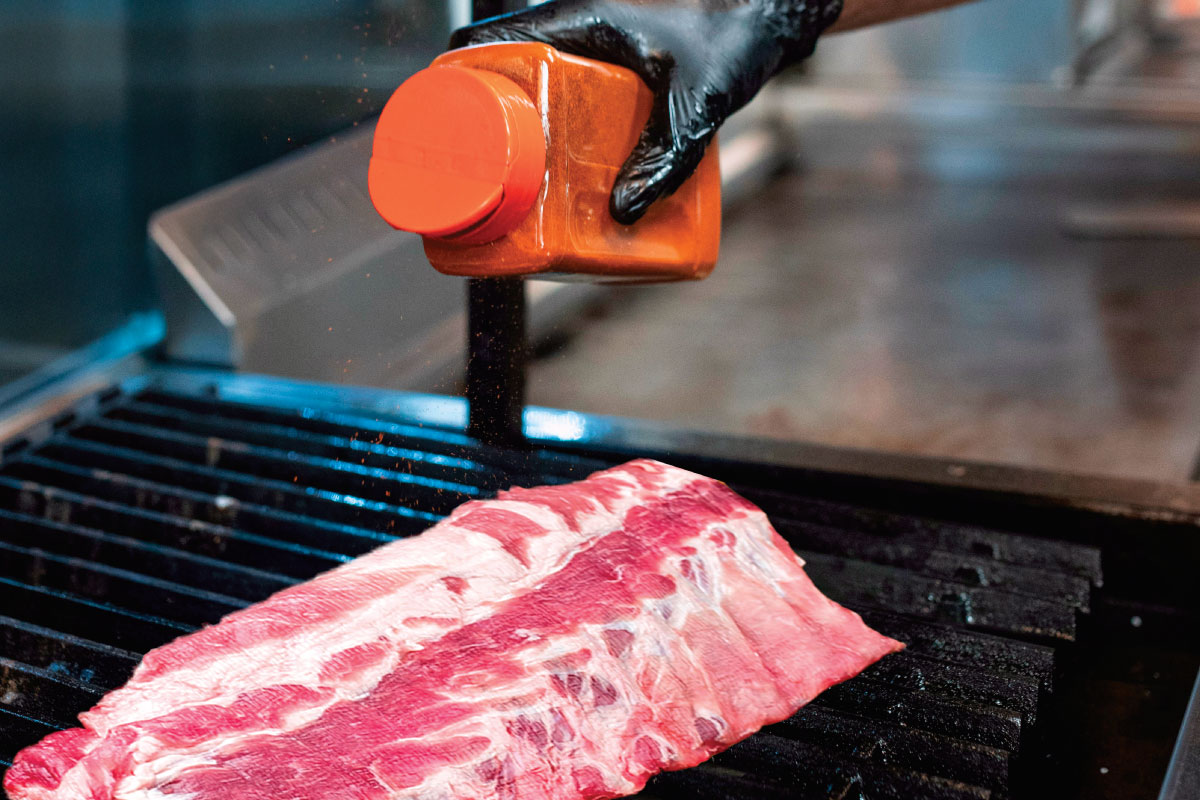
    Now, generously apply the beef rib rub to all the sides. You may want to skip the underside of the short ribs. It contains a membrane, that is similar to the fat cap. The membrane is not permeable so the seasoning will not penetrate the rib meat.

    The membrane is sometimes removed with pork ribs, but with beef ribs it is generally not removed. The beef rib membrane helps keep the ribs together during the cooking process.

    BBQ Beef Ribs Seasoning - BBQ Rib Rub - Boning Knife

    Pro tip – Save the fat cap trimmings for sausage or rendering down for beef tallow.

    Time to Rest and Prepare the smoker

    Your dry rub for short ribs has been applied and we would recommend letting it sit for 45 minutes.

    Fire up the smoker! Get it warmed up and let’s prepare to smoke these ribs low and slow. You will want to lock in the grate temp around 225-250 degrees.

    The temps may fluctuate during the cook so don’t be concerned if your temps climb to 260-270. This is normal, especially if you use a charcoal smoker.

    With beef ribs, we recommend hickory wood to complement the meat and the beef rib rub. Hickory is a stronger flavor of wood so don’t use too many chunks. Three fist size pieces or three handfuls of wood chips are what we recommend.

    Let’s Start cooking the Beef Ribs

    As your smoker warms and stabilizes, put the beef ribs on the smoker. Plan to smoke these ribs for about 4-5 hours. Periodically checking and spritzing with a BBQ sprayer if they start to get dry.

    BBQ Beef Ribs Seasoning - BBQ Rib Rub - Smoker

    Texas Crutch – Wrap Those Ribs

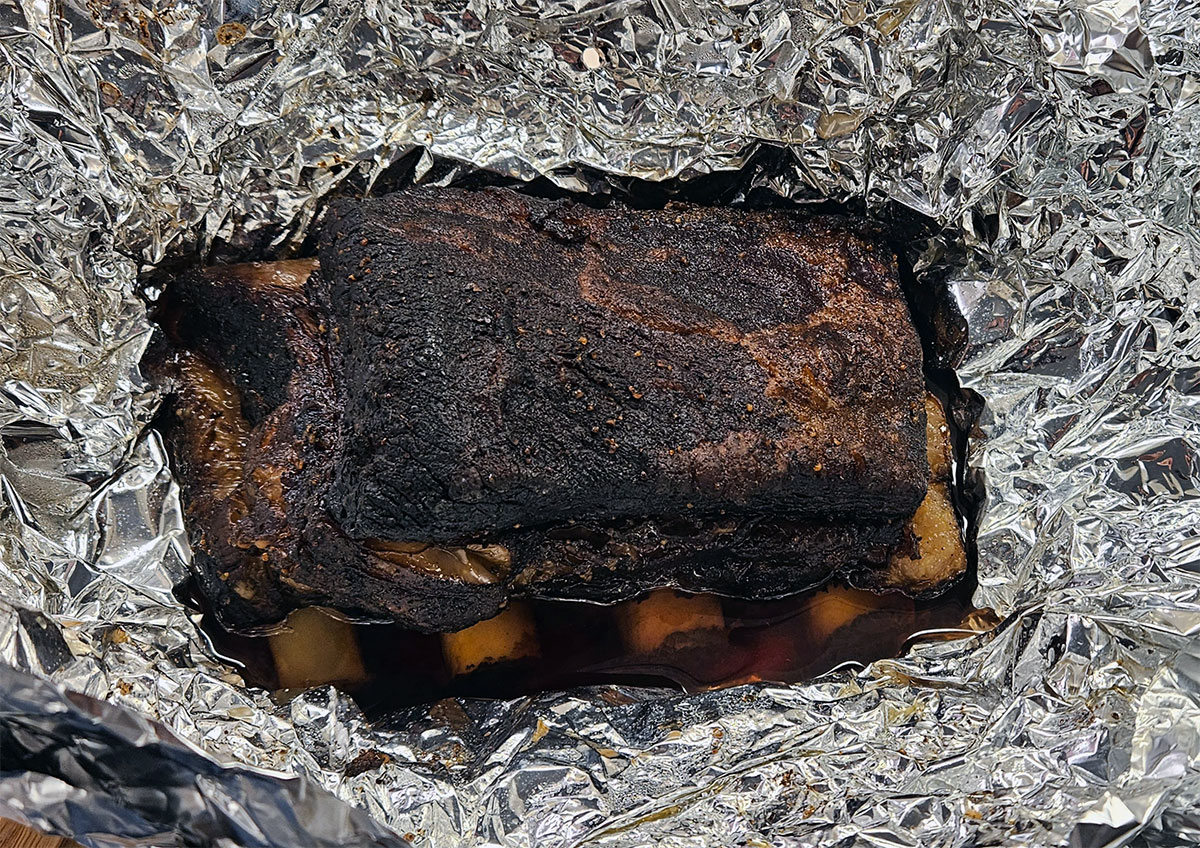
    After a couple hours and your ribs hit an internal temperature of 160-170 degrees it’s time to wrap. This is a method known as the “Texas Crutch”. When you wrap the ribs it decreases the cooking time and makes the meat extremely tender.

    In this example we wrapped in aluminum foil, but you can also wrap it in butcher paper.

    Pro tip – Now a lot of people will say the beef ribs are done at a certain internal temperature, 200-210 degrees. A good rule is to use a probe thermometer and probe the meat. When it is like probing butter, then they are done!

    BBQ Beef Ribs Seasoning - BBQ Rib Rub - Texas Crutch

    Rest those Beef Ribs

    Grab a cooler and a towel and let’s rest those ribs. You will want to wrap your ribs in the towel to protect the cooler. The towel also add another layer of insulation.

    Let the ribs rest for at least 30 minutes, but the longer the rest the better.

    Now slice and serve!

    In Conclusion

    Using our dry rub for short ribs, you know how to smoke beef short ribs! It may take a few tries to get it where you want, but don’t be discouraged. Smoking meat is a process that takes time to learn and you will always tweak your process to make it better!

    Now let’s get some beef rib rub and start cooking some ribs!

  • DIY BBQ Rubs – 5 Easy Homemade BBQ Rubs

    DIY BBQ Rubs – 5 Easy Homemade BBQ Rubs

    DIY BBQ Rubs are something many pitmasters enjoy making. The process of measuring spices reminds many of us of watching our dads work their magic at weekend BBQs.

    Experimenting with different seasonings, and creating your own rubs is very rewarding. The feeling you get when everyone is enjoying the food and complementing how delicious the food tastes is like no other.

    Let’s dive into five easy homemade BBQ rubs guaranteed to add amazing flavor to your smoking sessions. These recipes focus primarily on pork ribs but work beautifully on shoulders, butts, and loins too.

    The Classic Pork Rib Rub

    This foundational DIY pork rub delivers that perfect balance of sweet, savory, and smoky. It’s reminiscent of those neighborhood cookouts where dads competed for bragging rights.

    • 1/4 cup brown sugar
    • 2 tablespoons paprika
    • 1 tablespoon kosher salt
    • 1 tablespoon black pepper
    • 1 tablespoon garlic powder
    • 1 tablespoon onion powder
    • 1 teaspoon cayenne pepper

    This DIY BBQ rub is one that smoke clings to. The sugars will caramelize beautifully during the low-and-slow process and create a gorgeous brownish-red mahogany color.

    Apply the rub liberally to your rack of ribs at least 45 minutes before you start cooking.

    Sweet Heat BBQ Seasoning

    This DIY BBQ rub delivers nostalgic flavors with a modern kick. This rub captures the essence of those 80s and 90s backyard gatherings but adds to a contemporary feeling of enjoyment.

    • 1/3 cup Turbinado sugar
    • 2 tablespoons smoked paprika
    • 1 tablespoon chili powder
    • 1 tablespoon ground cumin
    • 1 tablespoon ground mustard
    • 2 teaspoons cinnamon
    • 1 teaspoon ground chipotle

    The merger of sweetness and heat creates a delicious flavor profile for this DIY rub. Turbinado’s molasses will complement the chipotle’s smokiness on your ribs.

    We recommend this rub on baby back ribs. Apply generously and let it sit for 45 minutes before you put it on the pit.

    Smoky Memphis Style Dry Rub

    This DIY BBQ rub is for the purist who appreciates a traditional Memphis approach. This DIY dry rub for ribs is amazing and will offer an authentic BBQ flavor.

    It honors the dry rub tradition that made Memphis BBQ legendary

    • 1/4 cup paprika
    • 2 tablespoons kosher salt
    • 2 tablespoons black pepper
    • 1 tablespoon garlic powder
    • 1 tablespoon onion powder
    • 1 tablespoon celery salt
    • 1 tablespoon dried oregano
    • 1 teaspoon dried thyme

    Memphis style means no sauce needed and the spice blend creates depth of flavor without overpowering the pork.

    Apply the rub generously on your protein about 45 minutes before you plan to start cooking.

    Herb Infused BBQ Blend

    Herb infused DIY BBQ seasoning is a bit unconventional. It incorporates fresh herbs for a unique aromatic flavor profile.

    We view this herb infused rub as a refreshing departure from strictly spice based BBQ seasonings we find now days.

    • 2 tablespoons kosher salt
    • 2 tablespoons brown sugar
    • 1 tablespoon fresh rosemary (finely minced)
    • 1 tablespoon fresh thyme leaves
    • 1 tablespoon cracked black pepper
    • 1 tablespoon garlic powder
    • 1 teaspoon lemon zest

    The green profile of this BBQ rub will definitely have eye appeal. Fresh herbs add distinctive qualities that dried ingredients simply cannot match.

    This BBQ rub works wonders on pork loin roast, pork belly, and pork chops. Apply this rub generously just before smoking for the best result.

    Carolina Gold Mustard Rub

    For our final DIY BBQ rub, we are drawing inspiration from the Carolinas. A distinctive Carolina Gold Mustard Rub straight from the mustard belt!

    This is a BBQ rub that is for those seeking something different. It is beyond the conventional BBQ styles we find at most restaurants today.

    • 2 tablespoons yellow mustard powder
    • 2 tablespoons brown sugar
    • 1 tablespoon paprika
    • 1 tablespoon kosher salt
    • 2 teaspoons black pepper
    • 1 teaspoon garlic powder
    • 1 teaspoon cayenne pepper

    If you have not experienced a mustard-based rub, you are in for a treat! This rub penetrates deeply into the meat during low and slow smoking process to achieve a unique BBQ mustard flavor.

    Apply this BBQ rub generously and put it on your protein 2 or 3 hours before cooking.

    In conclusion

    Creating DIY BBQ rubs connects us to BBQ traditions while allowing our own personal expression. These five recipes are used as starting points.

    Use these rub recipes and experiment with your particular flavor profiles. Feel free to adjust the ingredients to your preference.

    Also, you may need to double or triple the rub recipes to have enough for what you are cooking.

    If you don’t have time to mix your own DIY BBQ rubs, we’ve got your back. Our premium line of craft BBQ seasonings captures some of these same flavor profiles.

    At the end of the day, just experiment and start cooking! Enjoy the warmer weather and make some DIY BBQ Rubs!

  • BBQ Chicken Seasoning for Backyard BBQ

    BBQ Chicken Seasoning for Backyard BBQ

    BBQ Chicken Seasoning is what your bird needs! This seasoning is what takes us back to our youth. With the mixture of honey and other seasonings, dads want to share this experience with their kids.

    Pass the torch if you will.

    Award-Winning Flavor for Your BBQ Chicken

    Butcher BBQ Honey Rub is the BBQ chicken seasoning we were talking about. This rub has earned the prestigious title of “Best Rub on The Planet” in 2022 and for good reason.

    This exceptional BBQ chicken seasoning delivers sweetness, and pleasant flavors every time you dust your birds. The honey elements create a beautiful, caramelized exterior on your whole chicken.

    Most pitmasters discover their results improve dramatically when using championship blended seasonings.

    BBQ Chicken Seasoning Application Techniques

    Your BBQ chicken rub should be generously applied to all surfaces before smoking. When cooking a whole chicken, don’t forget the chicken’s cavity and under the wings.

    Pro tip – Don’t rub your BBQ chicken rub! You only want to press or gently pat the seasoning into the skin or meat.

    We would recommend applying your chicken rub for smoking six hours before cooking time.

    When the BBQ chicken seasoning sits on the meat it is a technique called “dry brining”. Dry brining allows the salt and other seasonings to fully penetrate and enhance the natural flavors of the meat.

    If you don’t have six hours, at least give the seasoning an hour to dry brine.

    Time to Smoke that Bird

    After the BBQ chicken seasoning has sat it is time to put it on the smoker!

    When it comes to poultry, we recommend cooking hotter and faster, around the 300-325 point. Poultry seems to need a hotter fire in order to reach the 165 internal temperatures.

    Cooking Hotter and Faster

    Whole chickens with our BBQ chicken seasoning respond beautifully when cooked at a higher temperature. Pair Butcher BBQ Honey Rub with fruit woods. Our favorite is apple wood, but cherry wood adds a delicious flavor as well!

    Now, maintain your smoker temperature around 300°F for ideal rendering of the fat in dark meat. The cooking time for a whole chicken will take 1.5-2 hours at 300 degrees.

    However, after about an hour you will want to monitor the internal temperatures. Use a probe thermometer and make sure it doesn’t over cook.

    If the wings or legs appear to be drying out, partially wrap them in aluminum foil.

    Now, the BBQ chicken seasoning will start to form a delicious crust, and the skin will crisp up as well. The curst is “bark” and adds additional flavors from the smoking process.

    Again, use your temp probe and make sure your internal temperatures reach 165°F for food safety.

    Citrus and Herb Stuffing for Smoked Chicken

    Many tasty BBQ chicken recipes call for citrus and herb stuffing alongside quality BBQ chicken seasoning.

    This is optional but worth it! The honey flavor in Butcher BBQ Honey Rub pairs remarkably well with additional aromatics inside whole chickens.

    Recipe below:

    Ingredients:

    • 1 medium orange, quartered
    • 1 lemon, quartered
    • 1 small onion, peeled and quartered
    • 4 garlic cloves, peeled and lightly crushed
    • 4 sprigs fresh thyme
    • 2 sprigs fresh rosemary
    • 3-4 sage leaves;
    • 2 tablespoons butter, softened;
    • 1 teaspoon black pepper

    Instructions:

    1. Prepare your chicken by removing any giblets and excess fat. Pat the chicken dry with paper towels.
    2. Season the cavity with a light coating of the BBQ Chicken Seasoning.
    3. Squeeze one quarter of the orange and one quarter of the lemon into a small bowl, then mix with the softened butter and black pepper to create a compound butter
    4. Gently loosen the skin over the breast and thighs and spread some of the citrus-butter mixture underneath.
    5. Stuff the chicken cavity with the remaining orange and lemon quarters, onion, garlic cloves, and herb sprigs. Don’t pack too tightly and allow some airflow for even cooking.
    6. Apply the Butcher BBQ Honey Rub generously to the outside of the chicken.
    7. Allow the chicken to rest with the stuffing and rub for at least 1 hour before smoking (up to 6 hours in the refrigerator is preferred).
    8. Smoke the chicken according to your preferred method, maintaining a temperature around 300°F until the internal temperature reaches 165°F at the thickest part of the thigh.
    9. Let the chicken rest for 15-20 minutes before carving.

    Pro Tips:

    • If you want an extra layer of flavor, add a cinnamon stick to the cavity.
    • If you prefer a stronger citrus flavor, zest the orange and lemon before quartering and mix the zest into your compound butter.
    • This stuffing is for flavoring only. Discard after cooking and do not consume.

    In conclusion

    So there you have it, BBQ chicken seasoning, and a delicious BBQ chicken recipe for stuffing. What more do you need?

    We cannot say enough about Butcher BBQ Honey Rub on smoked chicken. It is a pitmaster essential and you will definitely want to add this to your seasoning shelf.

  • BBQ Pork Chop Rub for Summer BBQ!

    BBQ Pork Chop Rub for Summer BBQ!

    We have a BBQ pork chop rub that is exactly what you need for summer BBQ! It is a rub that will add some sweet brown sugar deliciousness to your pork chops! It is Butcher BBQ Premium Rub.

    This BBQ pork chop seasoning is a pitmaster essential! It has everything you need for spicing up your chops.

    Our pork chops rub is made with brown sugar, because we all know that pork needs some sweetness! It has the usual ingredients, salt, pepper, paprika, garlic powder, onion powder, etc.

    What makes this BBQ Pork Chop Rub Different?

    What makes this rub different is it was created by David Bouska, Oklahoma BBQ Hall of Fame inductee. David is a legend among the BBQ community, and he knows how to blend rubs for some delicious BBQ.

    Best Way to Make Pork Chops

    The best way to have pork chops is to make your own!

    Picture this, you picked up a whole pork loin from your local butcher. With your trusty boning knife in hand, you slice the pork lion into 1-1.5 inch thick pork chops!

    Boom Baby! That’s what I am talking about!

    Add the Rub to your Summer Pork Chops

    Butcher BBQ Premium Rub comes in its own shaker bottle. Now pop the top and start dusting your chops. Make sure to evenly spread the pork chop rub across the meat.

    The orange, brown, and black particulates of the rub start to fall and immediately melts into the pork chops! They look and smell amazing! Pop them in the fridge for about 30 minutes and let them dry brine.

    Once the pork chops start to sweat you know there ready for the grill.

    Fire up the Grill

    Fire up the kettle and get ready to grill those amazing summer pork chops!

    When they reach an internal temp of 145, pull them off to rest. They will look and smell amazing! The orange color of the rub, perfectly seared grate marks, and a job well done!

    All you will hear around the dinner table is “Umm!” and “Wow these pork chops are delicious!” A delicious dinner for the family with your new BBQ pork chop rub!

    In conclusion

    So now doesn’t that sound like a great delicious dinner? Cooking some delicious summer pork chops with an amazing BBQ pork chop rub?

    Now it’s time to make it a reality with Butcher BBQ Premium Rub! You will be the family’s backyard pitmaster MVP!

  • How to Light a Charcoal Smoker

    How to Light a Charcoal Smoker

    Lighting a charcoal smoker is very easy. With a few pointers we will show how to hold the grate temperature steady throughout your cook!

    What is a Charcoal Smoker?

    A charcoal smoker is a smoker that is designed to use lump charcoal or briquettes as its fuel source.

    These types of smokers provide the unique charcoal flavoring we usually get from a charcoal grill.

    Charcoal smokers are also designed to cook “low and slow” vs “hot and fast” as with a traditional charcoal grill. The low and slow approach is preferred by many pitmasters. This process allows more time to infuse the charcoal smoke into the meat and create a smoke ring.

    Let’s start the lighting process

    In this example I will be using a 22” Weber Smokey Mountain with charcoal briquettes. The WSM is an upright charcoal smoker and it’s a fantastic charcoal smoker for beginners. I have used this charcoal smoker for many cooks, and it produces delicious food each time.

    First, use a charcoal chimney and place 12-14 briquettes on one side of the chimney. I try to stack the briquettes strategically to maximize the initial lighting process.

    Charcoal Briquettes - Paraffin Cubes Lit - Charcoal Chimney

    I am using Weber Lighter Cubes in this example. Place two of these paraffin cubes under the charcoal chimney and light the cubes.

    Pro tip – Use a cinder block or another grill to light your charcoal chimney. Over time the hot and cold from lighting charcoal can damage a concrete sidewalk or driveway.

    Paraffin Cubes - Cinder Block

    Now that your paraffin cubes are lit, place the charcoal chimney over the fire. This is important, make sure the flames are licking the charcoal otherwise they will not light.

    Charcoal Chimney - Paraffin Cubes Lit

    Give it about 15-20 minutes and your charcoal should be mostly white. This is when you know they are ready for the smoker.

    Charcoal Chimney - Lit Charcoal

    Add the Charcoal

    While your charcoal is lighting, add your briquettes to the smoker’s charcoal basket.

    My charcoal basket is an upgrade. It is an Arbor Fabricating Charcoal Assembly. This basket is much more efficient than the one that came with my Weber Smokey Mountain.  If you are interested use promo code “PME” at checkout to receive 10% off an Arbor Fabricating Charcoal Assembly.

    I highly recommend this upgraded basket! It has smaller grate holes that allows the charcoal to burn longer before falling into the ash below.

    Now, arrange your briquettes into the outside of the charcoal basket. I will be using the “Minion Method” when cooking with my WSM today.

    Charcoal Smoker - Minion Method

    What is the Minion Method?

    The Minion Method of lighting a charcoal smoker was created by Jim Minion. Jim came up with this method after trial and error to get his WSM to cook at a lower temperature.

    Basically, you arrange the charcoal in a circular pattern, leaving an open area in the middle of the charcoal basket. Then place a few lit coals in the middle.

    The result is your charcoal smoker will be easier to regulate temperature. This happens because the few lit charcoal briquettes will then light other briquettes slowly.

    Then regulating the intake vents, temperatures can be easily maintained in the 225-250 range.

    Adding the briquettes to the smoker

    Grab your trusty charcoal chimney and carefully dump the lit charcoal in the middle of the charcoal basket. Now place the middle cooking section on the charcoal bowl, add water to the water pan, and put on the lid.

    Charcoal Smoker - Charcoal Basket - Charcoal Chimney

    Locking in the temperature

    After adding the briquettes to the charcoal chamber, make sure all top and bottom vents are wide open. Continue to monitor the dome temperature gauge until it approaches 200 degrees.

    At this point I close the three bottom vents down to a width of a standard #2 pencil.

    Depending on outside temperature, wind, etc., you may have to open or close the vents more on your charcoal smoker.

    This will be a trial and error until you find the sweet spot for your particular smoker’s vents. I would also suggest leaving the top vent wide open.

    Set it and forget it

    Your charcoal smoker may climb in temperature, but not very much. If it does, close the intake vents a bit more to keep it around the 225-250 degree temp.

    Once the temp stabilizes, add your protein. Now it’s time to sit back, grab a cold drink, and let the smoke roll!

    In conclusion

    See it’s not so hard to light your charcoal smoker. You may still have temperature fluctuations, but this is normal. Remember when adjusting your vents, give it 20-30 minutes to stabilize.

    Also, now that you know how to light a charcoal smoker, you may need some BBQ seasonings! We have a variety of BBQ products to choose from for ribs, brisket, pork butt, etc. I would like to recommend our Butcher BBQ Honey Rub!

    It is now time to smoke some delicious food on your charcoal smoker!